Hack camera intervalometer adding 2 relay outputs
Output Two relays from camera intervalometer with a simple hack
There is many occasion where you need a simple timer; something easy to program (and re-program) with clear view of the sequence running.
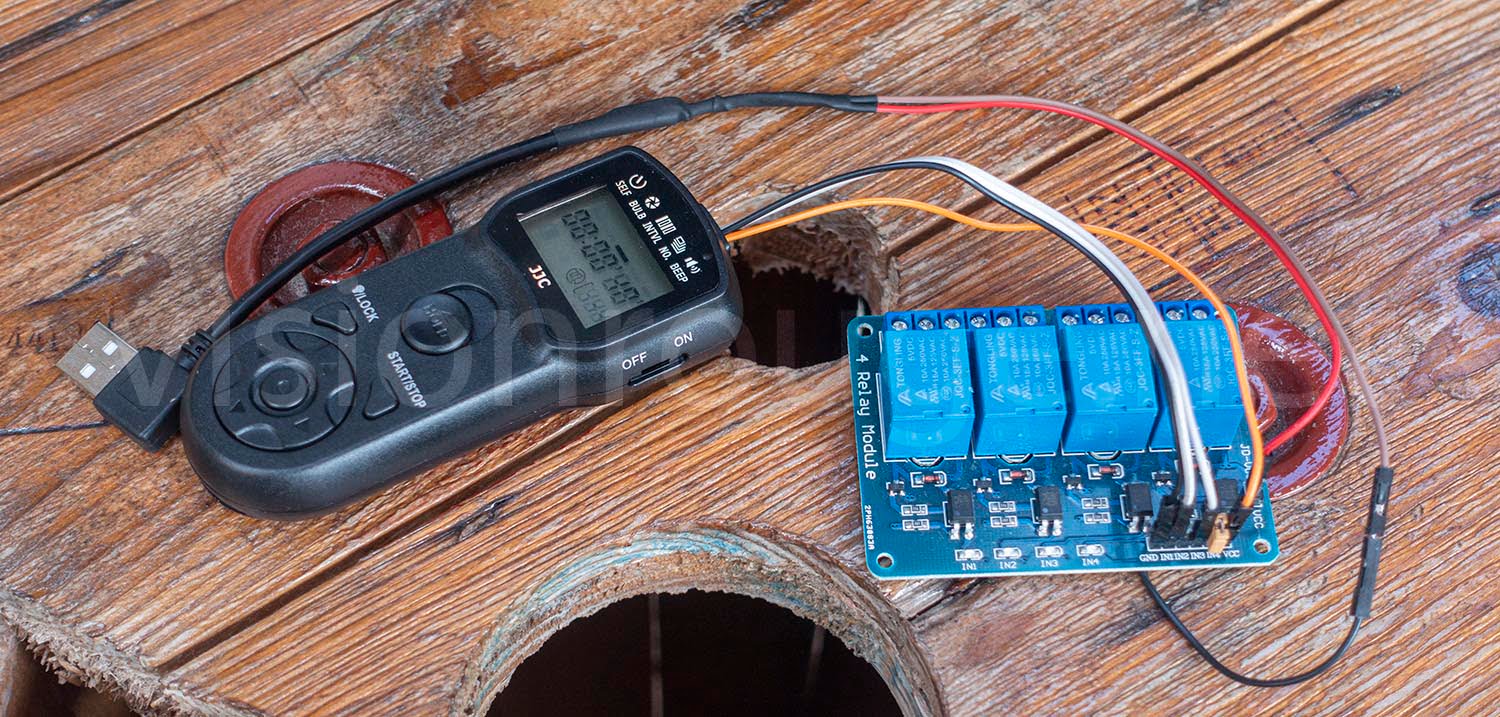
My idea is to use an existing camera intervalometer (Shutter release control) and connect it to a relay board with a simple hack. This way, we can cascade many actions with sequence easy to program and a nice screen to help you. As the remote already have few integrated timer; you don’t need to reinvent the wheel and focus on the other part of your project.
The beauty of it is the low price and the fact that many existing shutter release technology exist already. As soon as you will understand the way it works, you can start experimenting with wireless flash repeater as well to cascade many action without wires.
What this camera intervalometer hack is about?
The idea is to use a old tech shutter signal from the photographic world and simply adapt it to a array of relays.
Most of modern camera can take remotely a picture using a 2 signal, 3 wire remote. It use to be a simple wire pushing down the real shutter, but all is done electronically since DSLR took over.
One signal is use to emulate a half press on the shutter and the second one is a full press.

You can assign on your camera what you like to do with the half press state; but the default mode is to focus.
If you are happy with the half press focus area, you press fully the shutter and a photo is taken.
As a photographer, I usually do not work this way and assign the focus to another button. It allows me to “lock the focus” and do as many pictures without losing it. So, I never really use the “half press” function. But that’s another story.
Trigger remote technology
It’s always hard to get into these steps, but I feel important to describe what is happening inside the intervalometer.
This principle is working for Canon and Nikon as far as I know and not for Sony or Panasonic. The reason is the way the trigger order is understood by the camera body itself.
On Nikon and Canon, it’s very simple. It’s a open circuit that we are closing. There are 2 circuits actually. One to control the half press button and one to control the full press.
So it’s a 3 wires and 2 switches.
At the predefined time, the intervalometer will press one after the other these 2 switches. For this DIY time-lapse studio; we only need the “take a picture” function. The first focus switch output will be there to handle the light swap. The second output will be used to take a picture directly, assuming you are using manual focus
There is no power distributed FROM the intervalometer to the camera. It’s only a switch and the camera feel it by using it’s own power. The cable can be super long as it’s really a 0 to 1 state. I run 10 meters long trigger remote cable without any problem.
Here is how things works.

The camera have the line at high state, supposedly 3.3V, and the remote simply connect the ground to either one or both inputs.
The remote have one manual button 2 transistors internally to connect the ground on request.
Depending on the camera model, the plug to connect is different. On the one I choose, it’s a mini 2.5mm jack, easy to work with.
Please note that Sony or Panasonic do not use such system, but more a different level with few resistors, so this hack will not work with a Sony/Panasonic remote and camera.
Running a simple picture sequence
I have many of these intervalometers but they all present almost the same options.
If you like to loop, you should put the amount of request pictures to “–“.
Bulb is the time when Shutter and focus are activated.
Interval is the space between picture.
The focus is always 2 seconds prior to the shutter release on this model. I guess you will find some where this timing is also adjustable.

And don’t forget that you can always take over by pushing the manual button on the remote itself.
Last but not least, a start stop, button to pause at any time.
A buzzer is also present to help you in the dark. A simple LED is also blinking once per second to let you know when a picture is supposed to happen. The screen display the remaining time.
The relay board
The relay board can be ordered in many websites and come with different names. What you need to make sure is the way it can be controlled.
As your intervalometer will connect the ground of each input, you need to find one where the ground is the “input”. That actually the most common one if you look into “relay board Arduino” under Google.
It should look like this one.

Here is how each input is working. It’s quite simple, with an opto-coupler that trigger a transistor that trigger a relay.
The power supply for the relay can be completely independent from the one for the led /opto-coupler side. But if you order a 12V board, both sides waist for a 12V signal. So the intervalometer may not be able to accept such high voltage.
I have tried 5V an 3V and both are working just fine.
These relay boards exist with 1, 2 4 or eight relays. Here, only 2 are necessary, but it’s easier to chain them if you need extra output when ordering a larger board.
You can buy them individually and upgrade later.
The connection to the trigger remote is quite straight forward. The simplest hack ever!
To be noted that some relay board have the – connection ac common instead as the +3V as described here. No big deal, just need to to change le schematics if so.

What to improve?
The obvious missing part in this hack project is the power and I’m not sure how many days this setup can work. But as it’s powered with 2x AAA, It’s super simple to either put a 2 x D sized for plenty of juice.
On my time-lapse project, I’m using a 3V unlimited power on top of the battery. The camera is also powered with an external power supply.
I also suggest to remove the power switch on the side. It’s very weak and it may put your project at risk if it turns off by moving the remote. I have weld the contact internally to prevent this.

I ordered a 5V board by mistake, discovering later than some offer goes down to 3V. The relay are 3V and so the signal to apply to them too. It let you use only one kind of power for the entire remote + relay board. I suggest you go for such.
Funny enough, even with my 5V board, the 3V powered remote have enough voltage to light up the led and so trigger the order for the relay. I’m using a super cheap 5V usb charger as power for the relay.
Cost
The relay board can come at around 2 USD when the JCC intervalometer is bout 20 USD. The principle should work with many different models.
Building the same with an Arduino, including, board + screen + button + time to develop the software and debug will obviously be more expensive starting from scratch.
As you will see the shutter remote can be set as counter or indefinite loop timer going from few second to hours, have a screen and work on tiny 2 x AAA batteries.
Here is the 4 soldering points you will have to do; even the +3V power is almost ready for you!

Possible applications
I started this project as I wanted a simple way to trigger a picture with a specific lighting for growing time lapse studio. This way I could swap the growing/blooming lighting to a more accurate color rendering during a few lapse of time; enough to take a picture. You can read about my blooming photo studio here. So far, this is the perfect way to do.
One relay will simply trigger the camera and one will swap lighting.
I guess there are many applications when you don’t want to spend time programming an Arduino or Raspberry Pi.
Another usage from a Facebook audience suggest night sky picture . You can us it to turn on/off lights/lasers, etc during each time-lapse exposure at night. This device allows to get perfect exposure with those triggered lights along with the night sky.
Feel free to post your remarks below!
If you liked this post, feel free to click on the Google advertising banner. It’s 2 seconds of your time and a tiny cash back for me.
I also have selected items to order on Amazon, but, of course many other shops can help you getting these.
One Comment
Post A Comment
You must be logged in to post a comment.
How to create a nice Landscape Time Lapse movie: Our tips. · VR
[…] love these little devices and you can find an alternative use there. It’s easier to program than going to the camera menu with some apps internally. You may want […]