[DIY] Built a grow/bloom plant time-lapse photo studio
[DIY]Create your studio to film grow and bloom plant time-lapse video
How a simple and cheap shutter remote controller for your photo camera can pilot a full studio lighting with few external component?
How can we achieve a day/night sequence as well as getting a nice growing + blooming plant time-lapse?
What kind of lighting we need for the growing part and the picture part?
There are many ways to achieve a plant growing studio, but I wanted to get one as simple as possible to reach a larger and cheaper result. I did not find so much online, so decided to write about this simple DIY time-lapse system.
This DIY plant time-lapse setup is based on a very simple intervalometer hack that you need to read first. Clearly, a simple Arduino or raspberry Pi would have done great, but many don’t even know how to program it.
The veg/bloom lighting I have choose is described here with the mod you may want to do.
Plant time-lapse growing photography principle.
To do such photography, you will need a completely dark room and a growing lights.
At desired interval, a camera shutter should be fired but the lighting will have switched to something with a much better color rendering than the growing light.
The room should be dark so only you can decide to get the exact right lighting, for the growing, blooming and picture time.
With only one kind of light source, the flower will also direct its grow to it.
I’m will describe first the kind of lighting you may need.Later, the way to connect to your camera and finally some tips on the camera and lens you may want to get.
Growing vs blooming light color
All plants, almost, goes from different phases.
The growing part is usually done within colder environment and a need for more blue color.
Blooming is happening faster in a warmer temperature with a red oriented light spectrum.
On top of this, you will need to have nights simulation for your plant to grow the right way.
Depending on your project; you may want to get the ability to choose one from the other.
For example: the growing part is tricky as the plant will move in many directions, while focusing on the blooming only seems easier.
On a creative perspective; blooming is usually more impressive than growing, so you want to check if you actually need a real “growing” lighting system or more a blooming light.
You may want to ask your local flower shop to get the bulb before they open; carry them in a low temperature bag until your setup is ready to shot. You will turn on warm yellow light for this phase (and even a bit of warm water to them too). The plant may open in the following hours!
It’s also interesting to notice than blooming can happen in few hours and may don’t need the dark night time. So I have separate this remote part as well.
As a single LED can only produce one specific spectrum, you need many kind to cover it. Some LED called “COB” actually have many small LED together to create a full range of frequency. In my simple setup,
I have opted for a array of light.

Here, you have some infrared and ultraviolet led that do not produce visible light for the camera to catch it. But your flower will.
#Blue color for grow
During the growing time; the plant need a bit more blue. Don’t over do it either, but a 20% to 25% is the most commonly accepted. This is what most of specialized shop will sell you. To your eyes, it will look a bit purple/blue lighting. It’s called plant growing light.
#Red (+BLUE) color for bloom
When you feel you need to speed up the flower opening; more red need to be added. It do not mean that blue should be removed, but you have to think about a mid June sunny day compare to a cold February. These light have a red/yellow color when turned on. Actually, the white LED contain enough blue. It’s usually called full spectrum light.
This is an example of full spectrum light I will be using that have the full spectrum + a bit extra yellow.

This particular one can be order online on this shop, but others will work too. I love the fact that it’s lightweight and easy to disassemble.
#High CRI white for picture
During the picture time; you need to get the maximum flat light response for the camera sensor. A high CRI rated LED light is necessary. It’s quite unlikely your growing light will have such (and of course, neither your growing led). CRI stands for Color rendering Index. 95 is considered as good.
For this project, I choose a light I have been using quite a lot on many shooting for it’s compactness and power. It’s a ring composed of 300 LED that can be dimmed. It accept a large input voltage from 10V to 18. I will add the milky diffusing filter to it. It’s a magnet that is holding both together. As the flower will be quite close to the lighting, you need something quite soft.
The ring shape color will also avoid any unwanted shadows as the idea is to do a shot from the top of the flower bulb.
You can order this light fixture here if you like this one.

VEG/Bloom Switching mode lighting fixture
Some lighting have even both mode and you can switch one to another depending of your flower age.
Usually, each part need different led to cover the light spectrum. It’s specific to LEDs as they are very precise on dispensing a specific color. There is no for example a real “white LED”; it’s always a Green+Blue+Red chip enclosed together. The power of each channel is controlled to give a specific spectra only.
If you are focusing on the flower blooming, it may not be recommended to go for the growing lamp you can easily find online but focusing on something which have more red/yellow/white LED than blue.
The LED I have automatically switch from one mode to the other if there is a 2 seconds loss of power. This is absolutely not what I need, so I have rerouted the power to get it working only in the maximum power mode: Blooming mode. You will need to open the light fixture, please unplug from power to do so. And here is my new set of precision screwdrivers that you surely will love!

LED or High intensity discharge (HID) or fluorescent
The answer is super simple: LED all the way.
On this time-lapse studio setup; you will have to switch lighting at each picture, so it’s absolutely necessary to use a light that accept to be turned on and off without damage. LED are perfect for this. It also need a fast response time to be able to switch as fast as possible from one or the other. HID light will need few minute to reach full spectrum as well as fluorescent tubes.
Blooming / growing light max power.
As all your lighting will be controlled with the relay board, you need to respect the maximum power they can control.
Be aware that you may read 2 different power on your growing plant light fixture. Some brand are displaying the power equivalent to boost their number. The actual electric power consumption is lower and you need to care about such only.
I will think that a growing light of 200 Watts is way enough per flower bulb! I have 2 x 45 W in my setup for a unique bulb.
The Rule is quite simple: P = U x I.
Power in Watts = Voltage x Intensity.
So if the relay display 250V, 2 A; it means it can commute 500W of power, purely resistive load.

As you are running a time-lapse plant growing studio; it’s quite unlikely you will need a lot of power anyways. One single flower do not request 1,000 W of light!
I will also choose a lighting fixture WITHOUT internal fan to be able to turn it off and on without a “loading” effect. The power supply with LED should already make your load not fully resistive, so, no need to play more with this.
I always try to get a 20% factor as safety. If my relay is said to control 1,000W; I will not be using it for more than 800W.
Disclaimer.
This DIY home studio will include many different current and electric power. The 220V or (110V in the U.S.) can kill you, so it’s important to have still a bit of electric knowledge before putting all together. At the same time, plant needs water. Please build your studio according to safety requirement to avoid any potential problem.
Don’t rush anything, built it step by step.
All camera will have their power supply and may be connected with the same shutter cable. It’s important to respect the right wiring to avoid potential ground loop. On my power supply, there is no ground, but some may have..
What do you need to create your plant grow photo studio?
Here is the list of element you will need:
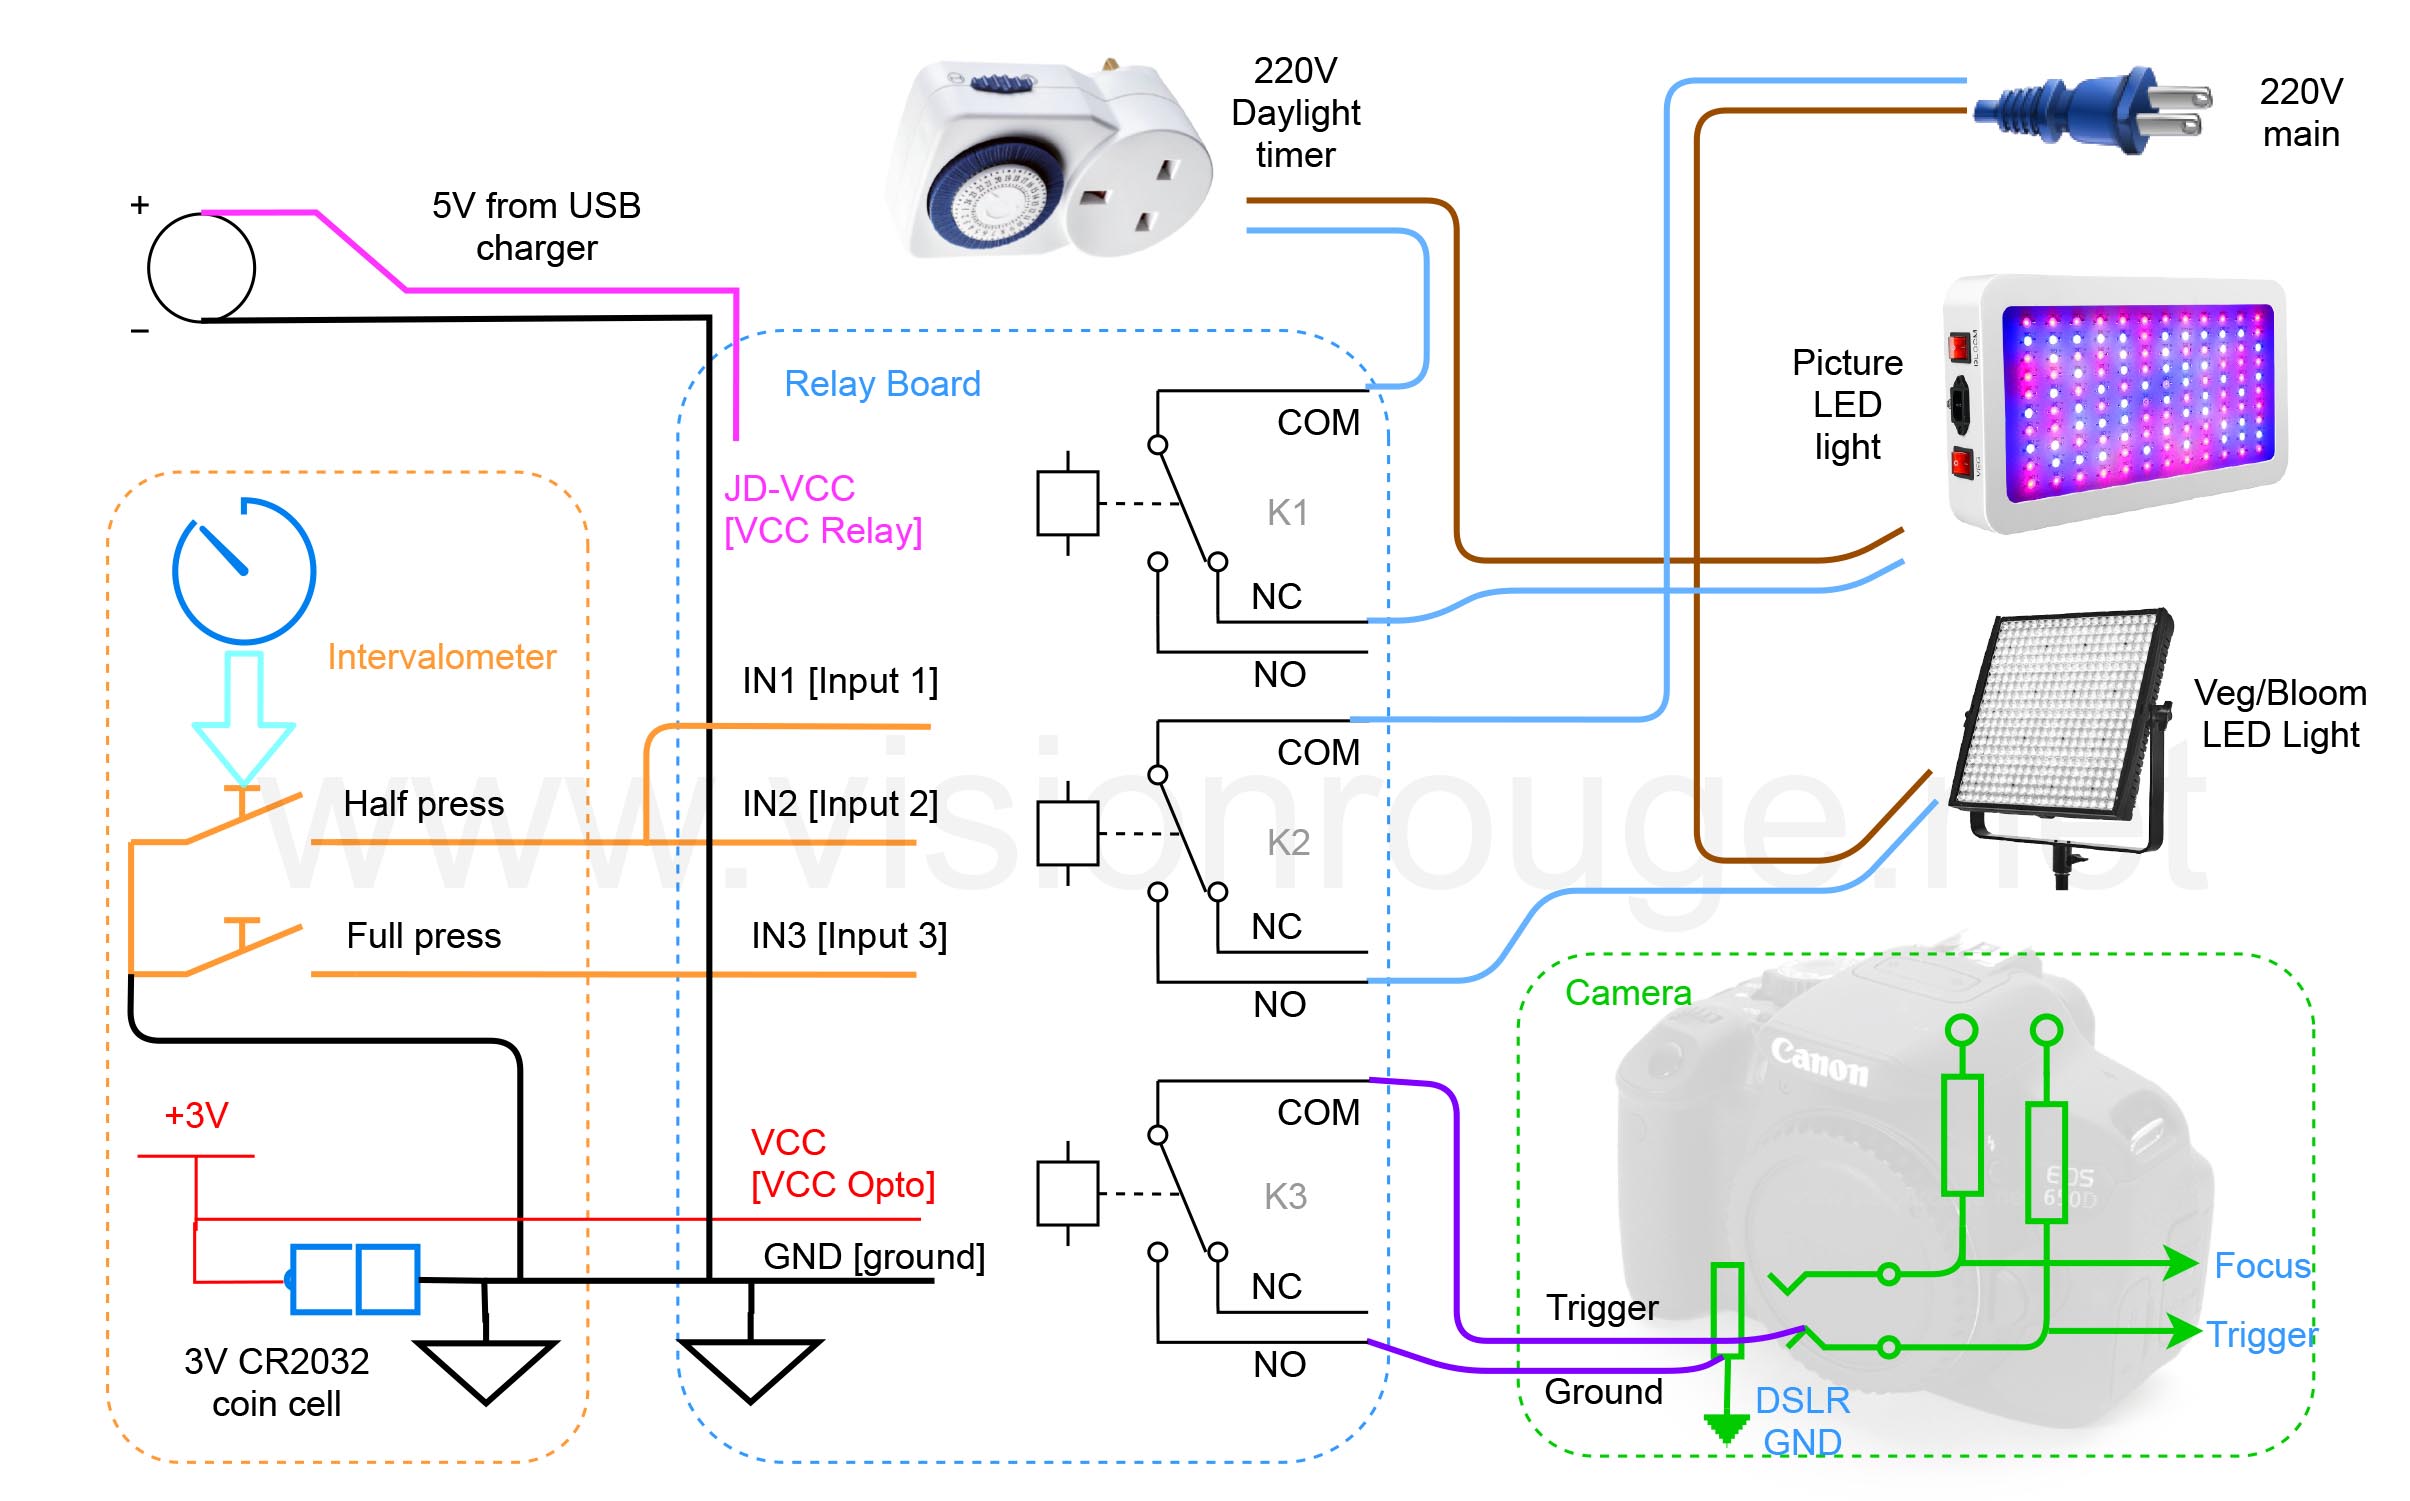
-> Shutter release camera controller + Relay board, based on the hack described in this post.
-> 24 h timer plug to simulate night/day if needed.
-> Camera + lens + large 256 gb memory card + power supply (you can run on it battery, but a real plugged power supply adapter will let you run it forever. On this project, I did not use Sony or Panasonic trigger remote, so only Canon or Nikon camera can be used.
-> White LED lighting for picture time. (I’m using a LED ring around my lens for perfect light without shadows), you can find them here, but others will work too.
-> Growing / blooming light fixture depending on your desired plant blooming video. I prefer 2 stripe on each side of the pot, so the flower keep growing in the middle of these. You can find a similar led growing panel available online.
-> black/white cloth to cover the wall of your studio and get a final time picture standing out.
-> a bit of your time!

As you can see; there is nothing hard to find or which need any software. The camera shutter remote will be the brain of the setup. It have already a screen + input buttons; so my hack is only a way to distribute the output to different power.
Build your growing plant DIY studio
The way it will work is quite simple.
Let’s explain step by step.
Here is a basic time-lapse setup: one camera + one intervalometer.

Now, we can have the same setup, but all will run on external power supply.
This is to run it forever.

In this new setup, we are adding the relay box that can also control the lighting.
At regular interval sequenced with the trigger remote; the full lighting will switch from Veg/bloom mode to picture mode; a picture is taken few second later.
The remote activate 2 relays:
– one for the camera shutter release to take the picture
– one for the lighting swap between grow/bloom and studio picture.
I have assume your shutter duration will be quite short. If you need longer exposure, you will have to change the duration of shutter press from the remote screen.

The last and complete setup include an extra input the get the night/day sequence.
During simulated night time; only the picture mode light is activated (or not…).

The shutter remote (intervalometer) should be programmed with a bulb mode of few seconds, so the relay for the lighting commute first, and the camera shutter is activate next. Other sequence are possible, of course. Depending on your time-lapse plan, you can think of a picture every 5mn for fast blooming and one every 20mn for the growing part.

The full electric schematic is here.
The input 1 and 2 of the relay box have been linked together to get 2 relays working in parallel. This will allow a day/night illumination, but still taking picture during this time with the White LED system.
The third relay is connected to the camera trigger system.

Which camera / lens should I go for my time-lapse studio?
There is no need for a very professional camera body as the most important part is the sensor more than the body itself. You will be putting the camera indoor on a fixed tripod, so IBIS or water sealing is not a necessity. Also, you will have a video at the end, quite likely to be compressed for social media export. So each picture just need to get enough pixel and dynamic range.
It needs to be compatible with the remote system, so most likely Canon or Nikon.
I also do not recommend a full frame camera as you may want to get a large depth of Field to get most of the flower blooming in focus. With a crop sensor as APS-C; it offers you already better option.
My go to is a Canon 800D (The Canon 850D is now available too) It’s a perfect camera for such time-lapse using the RAW file as output. The JPG pictures directly out of the camera body are not so good.
On the lens side, You need to get a manual focus NOT driven by wire to be able to lock it down). I love the Tokina range as they have a mechanical hard stop o the focus ring. For this project; I’m using the sigma 35mm ART. It will gives an equivalent of a 55mm Full frame so the flower is not distorded.

The lens is equipped with a printed focus ring to be able to adjust it precisely and lock it down eventually.
I will use an aperture around F8 to get the full flower in focus and the best sharpness from the lens.
I put a huge 512gb SD memory card, so I don’t need to remove it from the camera the entire duration of the blooming. This will avoid any shacking. This card is quite cheap as you don’t need a super fast model.
Possible add on to your plant blooming time-lapse studio
Obviously, as we have now a powerful relay to control one camera; it’s easier to remote many camera shutter altogether! So you can easily have multiple cameras focusing on many different framing or bulb working in parallel to maximize the time-lapse video impact. Make sure you connect all he ground the same way and you can easily have 10 shutter released at the same time!
I will suggest to get same camera brand if you connect directly the shutter plug together.
The second thing to add maybe some battery backup, especially on the main controller side. If power drop for one second, the intervalometer lose its sequence and your time-lapse video is over.
It can be done simply by adding a battery in parallel with the power supply + a diode to avoid charging it. In case of power loss, the battery is taking over for the few minute the power is missing.
If you liked this post, feel free to click on the Google advertising banner. It’s 2 seconds of your time yo support such posts.
One Comment
Post A Comment
You must be logged in to post a comment.
Camera intervalometer [hack] add 2 relay outputs!
[…] color rendering during a few lapse of time; enough to take a picture. You can read about my blooming photo studio here. So far, this is the perfect way to do. One relay will simply trigger the camera and one will swap […]