Sony FS7 hand-grip slipping repair *FIXED
SLIPPING REPAIR Sony FS7 hand-grip *FIXED
Here is the way to repair the slipping Sony FS7 hand-grip by yourself. It will involve some tools and some time, but still faster and cheaper than buying a new one. This fix is working on a Sony FS7 Mark I, and I’m not sure the Mark II suffer the same problem. It seems that the Sony FS5 or FX9 share another system, which is also faulty, but for others reasons.
What is happening when your hand-grip is slipping?
You have you nice FS7 camera for a while, or bought it second hand and notice something super annoying. When you choose the right position on the hand-grip, it do not lock anymore. The hand-grip seems to slip between each position with a scary noise at each step. It get hard to be confident when holding the camera in certain position and it start to worries you about the full rigidity of the system.
If your camera is under warranty, you may just want to ship it back as soon as the slipping start to shows. One main axis is broken and it will not be back by itself or with some glue.
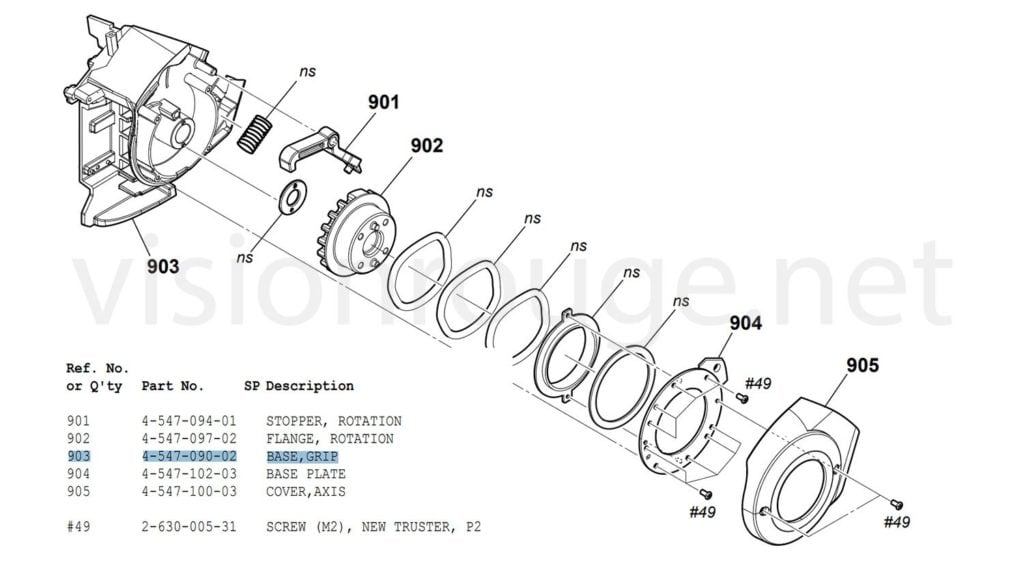
Looking at the FS7 repair manual, you can see the inside of your grip and the way the hand-grip is getting lock. One moving locker (901) is rotating when pressing the push button and pushed back with a strong spring. It lock to the piece number 902 and not suppose to slip from there.
On your camera FS7 hand-grip, the axis that make this locker move is simply broken, so the locker can now move up and do not fit the teething anymore on 902.
This is a very classic issue and you are not alone with this slipping problem.
You can either try to order a full new hand-grip for about 800 USD, or contact Sony to get the spare number 4-457-090-02. In mine, the plastic cover 905, Sony spare number 4-457-100-03, was also damaged. This cover also have a support for this axis, but it’s way too thin and it may be broken as well.
It’s easy to remove the black cover of your hand-grip and notice the 2 problems.
(A) is the broken aluminium axis and (B) is the plastic cover cracked.

>But wait, there is another problem!
Either you decide to order the spare parts from Sony or follow this DY repair; you will face another common issue. The 4 screws that links to the arm itself are almost impossible to remove. I have tried to heat them, to use the perfect screwdriver; to bet them with a hammer,…nothing was working for me.

The first step will be to unscrew these and I managed to get only one out by force. I have to literally drill it with a 3 millimeters diameter drill.
You need to try to remove it with a screwdriver first, and the cross will start to be more like a hole as you apply as much force as possible. But it’s actually good to damage the cross as it will be perfect to guide your drill in the center. It’s actually a bad thing if you are NOT drilling in the middle of the screw.
Do not drill too deep the screws. It will be hard to remove the leftover without some metal to grip on.
If you order only the hand-grip, you will also need to think about doing this. And if not, be ready for a crazy 1,200 USD investment to get the new arm as well from Sony. You could buy a Sony Alpha 7 mark III for the same price. Also, I assume you can easily find new M2.5 screw to lock the hand-grip to the arm at the end of this DIY project.

The last screw was a bit shorter and not easy to grab, so this pliers did the trick. Please don’t start this hand-grip fix if you do not have all the component ready. This is not a complicated DIY, but it’s better to follow each step carefully to avoid breaking something else. If you couldn’t remove entirely all the screws from the arm, you may wants to keep drilling with a smaller diameter and remove the crew this way.

How the broken locker look from the inside
After removing the last cover, you can clearly see where the Sony engineers should have spend a bit more time on their design. The locker axis is broken, but if I look at it size compare to the force that are constantly applied to it, I can understand. It’s a clear design flaw. In my case, this camera is far from being under warranty I also feel that fixing it at home is better for the planet.
 In this picture, the hand-grip locker has been removed as well as the spring. There is no more screw to remove, you are ready for some metal work.
How to fix your broken FS7 hand-grip locking axis with one tool?
What about getting a new axis? I noticed the diameter is almost similar to a M4 screw. The locker is also in aluminium itself, so quite strong. As all is in aluminium, I don’t have any idea if it will be possible to solder or glue back the old axis. To my experience, it’s not possible, but feel free to share your experience in the comment section. SO I went of something simple as a new hole in place of the axis and using a tool to screw a M4 axis. The metal there is quite thin, but I guess way stronger on the axis direction. If it was to keep it in place vertically, this repair will not work.
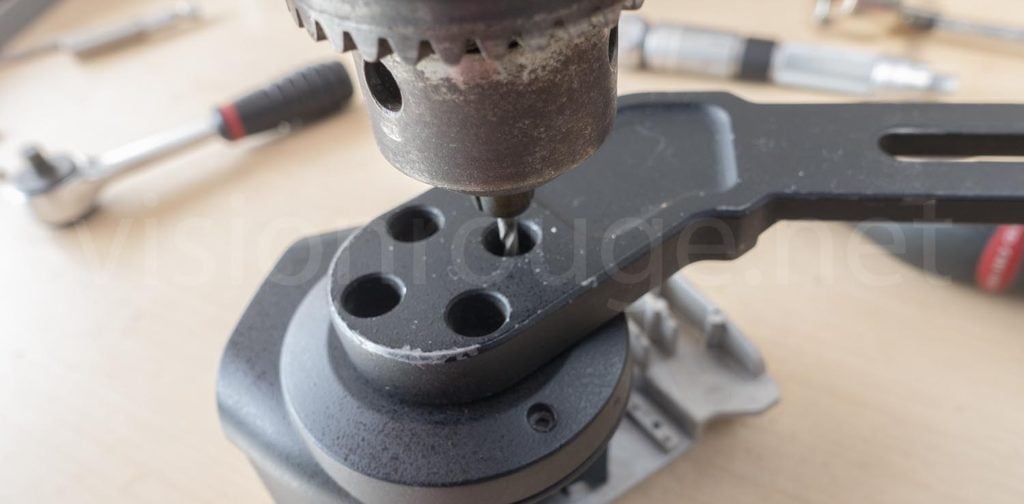
Here is the tools you need to have. There is no point of going forward without these. It’s super cheap and easy to get, but without it, you axis may not hold firmly. This tool can fix and improve a lot of other camera gear , so it’s not stupid to invest on them. For eaxample, you can drill a aluminium NATO rail to support some accessories using M4 screws.
 The drill is 3.2 millimeter diameter and the second tools is named M4x0.7 in order to create a m4 screw hole.
The aluminium part from Sony is super easy to drill and quite smooth. You need to be perfectly vertical with your electric driller. Do not over do it. A simple hole is enough as you need as much material as possible to get the best grip. I’m not so lucky to get a full tool set, so I just block it this way and drill by following the old axis center.
It’s also important to keep the aluminium crumb away from the grease. They will get stuck and will not help the locket to move easily in the hand-grip. You can, of course, remove the entire grease there, but don’t forget to add some at the end.

The next step is to create the M4 hole. I guess you will need a bit of training if it’s your first time. The metal is quite thin, so you don’t have too much to work with. Feel free to practice on another aluminium part to be ready for this one. You only have one shot to fix your the Sony hand-grip.
Usually, you should slowly pushing down by rotating the tools with your hand. It’s safe to rotate backward time to time to avoid too mush aluminium dust. That the only tricky part to do. Again, if you mess it up, you may later use a larger axis and glue it instead of the M4 screw.
When you have something looking like this, your Sony FS7 hand-grip is almost fixed.

Design you own hand-grip locker axis.
The next step is to get a new axis in place by using a M4 screw. It will just fit the hole you have created. You can glue it to avoid slipping. But when I have try to put back altogether, I forgot a small detail.

As you can see here; the hand-grip menu 4 axis button is actually right on top of the screw. This is maybe the reason why Sony made this part so thin and why it brake for everyone.
You need again a bit of time and a simple metal file to create your own locker axis. I have choose a aluminium M4 screw as it’s easier to work with. To make sure I do not mark the thread screw, I use a double bolt locking system. It helps locking the screw when cutting it with a metal saw. I have to be get the right length which is easy to check. When you screw it, you should stop as soon as it reach the plastic cover. Keep enough to be able to glue it to the aluminium base as show below.

To screw it, you will also need to do a simple cut inside so your screw diver can get inside. The other advantage of using aluminium for this part is that it’s quite soft metal. So when you are going to screw it many time to do your check, you will not damage the existing hole too much.
Again, you don’t need specific tools, a simple metal blade will do the trick. This is the way it looks at the end of this part.

The axis replacement will be fixed by putting it the other way, but this is just to test the length. I’m using the side of the screw which is not cut and so fit easily the hole. It’s important to get a metal file to let it fit perfectly. To fix you hand-grip, it should be installed this way to hold the hand-grip locking device. It gives you an idea of the final length too.
 But as you can imagine, it still a bit too thick to let the Sony FS7 hand-grip joystick fits, so you need to work on the other side now. I use the same double bolts locking idea to do the third and last operation. A metal file and 2 minutes work by hand get you to the final shape.

Glue VS Grease.
Next and last step is again a bit tricky. One side of your axis should let the locker rotate, but the other side should be firmly glued to the hand-grip itself. Glue do not like grease and grease do not like glue.

I’m using a thread lock glue as it’s perfect for such. If in the future you need to remove the hand-grip locker, you will need to remove the axis as well. You could also remove the 20 screw or so on top of the hand-grip brake system. I let you decide what is the best for you.
I suggest that you try one more time without the glue to fit the hand-grip joystick electronic board. Make sure to try to put the plastic cover and that there is no pressure on it. All should fit just fine.
You can insert the spring at last. But the hand-grip locker need to be with its axis. If you glue it without the locking mechanism, you will need to disassemble the entire braking system to insert it later. It’s not impossible, just losing some time.
The final step is to wait the glue to dry before closing it. It should look like this.

Your repair project is over. You still need to put back the electronic boards. The joystick goes first. The push button is the next one as the other boards are on top of it. My fixed hand-grip is now locking perfectly without any slipping. I have try to hold the full camera weight to put pressure on the locking device and it was just fine.

Hope you did like this repair project, feel free to participate to my tooling by buying me few items and keep this website from growing!
You can either just click on one advertising below of choose to send 5 USD via Paypal!
And if your FS7 Mark 1 camera is a bit old, please check also my post about the ND filter wheel. It may be a even bigger problem on a shooting day.