How de-flicker long term time lapse pictures for smooth video.
How de-flicker long term time lapse video.
After choosing your long term time lapse controller, install your power supply and wait month to gather all the pictures; the last step is to assemble these and create your final video. But If you simply drop all of your footage to a timeline, it will be flashing and shaking.
Here is a step by step guide on how to de-flicker your long term time lapse movie with simple effects. I will be using After Effect and Photoshop, but some filter effect can be found on other video editing software. Feel free to add you comments below this post.
In order to keep your long term time lapse video under control, it’s important to follow each steps. You may have thousand of pictures to deal with. It means a lot of data and easily lost track of your needs. Under After Effect, each steps means to create a new timeline. I suggest to give them a name starting with a numbers to make sure you are not lost on the order all is done!
1-Convert RAW to JPG to create your video sequence, … or not.
I will assume you have shoot all your time-lapse using RAW as JPG file directly from your camera body have limited information. It’s always better to get the RAW and convert to JPG in a software as Photoshop or After Effect instead of using he tiny processing in your camera to do it.
But importing RAW picture sequence to After effect may be also a too heavy load for your computer. So I found that it was easier and faster to create a RAW to JPG profile under Photoshop RAW module and apply it to all my pictures. I export directly JPG files from this process. This profile should be tested under the bightest day and the most cloudy one. This is the right way to make sure you have the best looking pictures sequence. In my case, the construction process included white cover of the metallic structure; so I tried to make sure this is not blow up by highlight under sunny days.

The second advantage it to be able to rename all the pictures by adding a specific counter that can run forever with 5 digits or more! At each RAW to JPG conversion, Photoshop keep remind the last batch and keep increasing numbers. That’s perfect for the following step!
If you have unlimited power and very demanding client, a direct RAW sequence within After effect is maybe the best way. To my experience, with a latest Xeon processor, 128 Gb of RAM and extremely high speed SSD; it still not smooth to work directly with large RAW batch of pictures. The first idea is to assemble all pictures in time order to make a movie out of it. To do so, you can import a JPG or RAW sequence in After Effect, but each picture file should have a specific increasing name to keep it in order. It should look like “Picture-0001.jpg”, “Picture-0002.jpg”,”Picture-0003.jpg … Picture-9999.jpg Your camera may already do this by itself. The last part should be a digit only to work seamlessly with after effect. There are plenty software to rename your JPG or RAW files in order to do so if not. If your time lapse enclosure run for months, it may have reached the maximum available number and reset to 0000. In this case, you will need to import each of these sequence, one by one to place them on your timeline. As I’m using Digisnap Pro so all pictures are actually stored per day, with a timestamp instead of a number. This is my first issue to take care. My long term time-lapse is running for more than a year, so I have to do manually a rename of 365 directories containing 100 pictures each! I suggest to import a JPG or RAW picture sequence under After effect as it was shoot. It means to drop the full thing under a sequence, whatever the weather or action. And the first manual job is to select what is important for your long term time lapse movie. As you have run your camera for quite few months, there are plenty of pictures you may want to edit out at this stage. For example, all the rainy day with water drop on the front windows, the non working period where nothing move in your construction area and the too dark pictures. I have a time lapse running with the sun facing the enclosure during the afternoon, so I have simply dropped these from the final movie. There is so many pictures already and it will be all speed up, so small jump per day are completely acceptable. As you will be speeding up and mixing your footage at one point, every small camera shaking will end in a blurry footage. Doing the stabilization prior to de-flicker is needed. Even with the best enclosure and mounting, you will have some slight movement during the long term construction project. Also, some heavy truck and crane work, wind and heat will deform the pole you are fixed too. When designing your time lapse housing, this is a very important point. I saw some project using simple plastic flight case. I don’t think it’s a great idea compare to something in aluminium for this reason. There are already few automatic filters ready for such stabilization under after effect as “warp stabilization” but I think there is a bug somehow from Adobe. On the footage I have from my one year project, it always slowly slip down whatever locking area I’m working with. I found that using a motion tracker on a specific spot that do not change over the entire construction was way more accurate. Working with a DSLR, you will have a 4/3 ratio picture.That means that you will be cutting out the bottom and top of your picture for a 16/9 video ratio export. So, I have framed my camera to include some protective wall that are supposed to be static on the installation day. The best is to choose a contrasted area to pick your tracking target. Choosing a tracking target is at the border of the frame will gives you more accuracy. It’s more likely that a automatic paying filter effect will do a great job to de-flicker the walls and structure, but the sky is quite harder to deal with. On all my testing, I always end with plenty of change from blue to white and it was quite distracting on the final movie. As you will speed up by 10 time the cloud, it do not matters how a single frame will look like and I found that using a magic filter solved my flickering problem. The only problem is that the filter is not very effective, so I have to stack the effect many times to get something looking like a cartoon sky. I have also make this effect working only on the top part of my sequence by the help of a mask. This is a very process hungry filter, so it’s better limit the area to work with. If you have setup your camera with a nice aperture, everything far away should be a bit blur too, so it help hiding the far far way mountains that get visible depending on the weather. Now that your sky look like a cartoon or water based paint, it’s time to check how to deal with the changing shadows and flicker on the most important part of your picture. You can easily find some other examples and advice by using some kind of transparency and frame blending. I will also be using such with a twist. In my specific case, the time lapse run for so long that the crane and other working trucks are very distracting compare to the building itself. It’s quite impressive how many time the construction crane is rotating. Unfortunately, it’s not so relevant for my client looking for the building itself. I have tried with success to use a paid de-flicker plug in called “Flicker Free”. It’s not a must have but will solve the remaining flickering. All depend the money you want to invest on your project, but I found the price was quite fine for the result. At this point, your picture should already look nice and way smoother. The next step will be to speed it up to fit your final movie. Right now each picture is filling one frame. It’s time to speed up this to avoid a 2 minutes duration boring movie. There are many ways you can do this, but if you choose the basic speed up, all the frame in between will simply be jumped and you will loose another chance of de-flickering your footage. With plenty of video effects and filters applied already; it will be very hard to get a smooth preview of the final video. The next step will be to frame your building with possible motion. I suggest you to pre-render your sequence at the maximum resolution. You can just use JPG sequence as format, so it will be easy to do some partial rendering. JPG is a compressed format and you may want to use the maximum quality possible using 10-12 as export parameter. I have tried to keep it simple in this post. My actual real filter is way more complicated as I wanted to remove the dust mark on my lens as well. By definition, a long term time lapse is running few months and the dust will some darker area in the pictures. As it’s in front of the camera lens, we can see it depending on the sun position. The “Smart Blur” was the best finding so far to do so. Feel free to contact me via the comment section if you have any questions in order to update this post.


This project is still on, but my time lapse camera took more than 10,000 pictures.3-Select your time lapse picture.
 Obviously here, it will be hard to de-flicker a movie containing this picture. Also, there are very little interest on keeping it!
At this time, I do not advise to resize your picture in order to get the full quality for the next step.4-Stabilize your video footage.

After effect have plenty of option on the tracking plugin. In my case a 85% certainty match did almost all the tracking automatically.5-Smooth and de-flicker the sky.

With the help of “Smart blur” effect in AE, I was able to blur most of the sky by keeping trees and the construction area untouched.6-How to de-flicker a long term construction time lapse video.
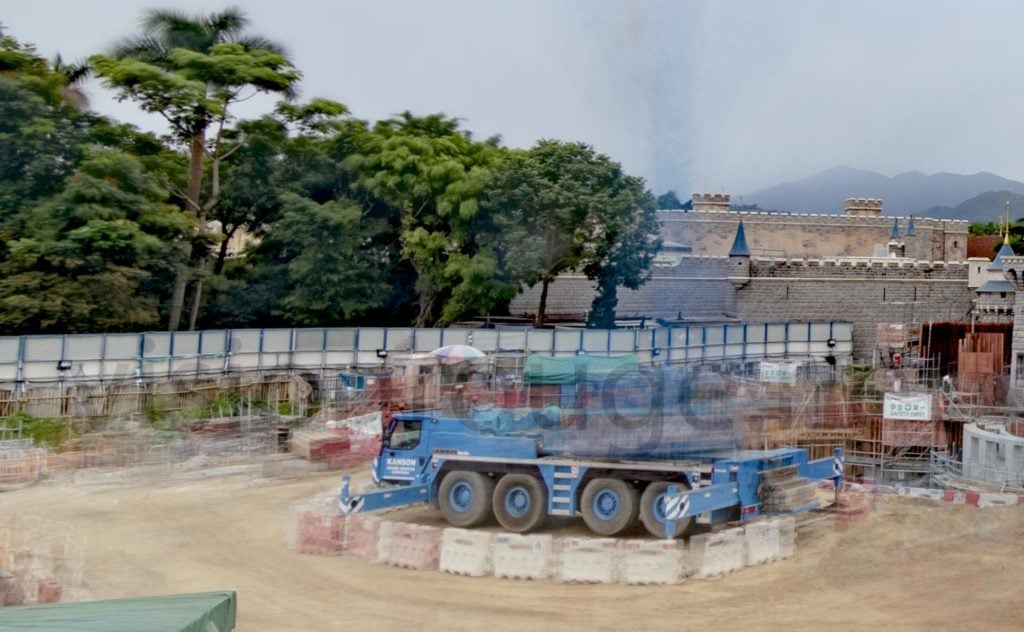
I fond a way to make the crane a bit more transparent as it’s darker than the building itself. The engine working around my castle are mainly blue and red and my building more a lighter color. It may be not the case everywhere.
I have stacked the same timeline 7 time with a 2 frames shift each time, and put a transparency using the “Lighten” blending mode. This way, the building walls are the winner compare to the moving part are they are lighter. The down side it to whiter the sky if you have the same kind of pollution as in China.
You can see below how it looks like. You can do with less or more depending on your footage.

I’m adding this effect to the next time line. Rendering every frame is now quite long.7-Extra smoothing when speed up your long term construction video
The best filter is time-warp using the option “Frame Mix” so each exported frame will include a blend of many frames.

There is no specific right speed, all will depend on the total amount of pictures you have. I found that a 20 seconds duration should be about fine to see the overall building construction. For me it means I need to speed up 10 time the normal speed.7-Pre-render your time lapse to animate your camera.

It’s super easy to re-import your JPG movie to a 4K or FullHD 16/9 ratio. You can change the way you zoom or pan in the footage for final render.8-Extra smoothing/de-flicker filters.
You can also add the “Echo” after effect filter to de-flicker as well. The difference between the paid filter and the Echo are quite marginal, honestly.
The order you apply all your filters can be different depending on your computing power. I also did another temporary JPG render to test faster what was working best in my situation.
And if you like this post, just click on one advertising below, I will receive a little bit of money to keep these posting! Free for you!