Sony PXW-FS7 mark1 vs mark 2, Which one to choose?
Sony PXW-FS7, mark1 vs mark 2, Which one to choose?
This is a very classic question when you like to enter the Sony S35 camera world, maybe upgrading from a FS5 or switching, as for me, from a Canon EOS C300.
There are few obvious differences between the FS7 mark I and the FS7 mark II. Where most of them can be seen as an improvement, I have to agree that the new lens locking system is still not perfect. I own both camera, bough a FS7 mark 2 first to get my my work covered. I bought a second FS7 mark 1 when a second angle was necessary for interview.
Sony FS7 mark1 vs mark 2, which one is the best for you? Please check the differences below from an owner point of view.
And if you don’t know that the Sony FS7 is still the smartest choice for one man band ENG setup, please check the competition here.
Vari-ND filter wheel.
If you already have a Sony FS5 or PXW 180/160; this is not a new feature. The Sony FS7 mark 2 have now a variable electronic ND filter as well. Technically, the ND value is now smoothly adjustable without a rotation wheels between each filter. This is a electronic ND system using the same technique as the LCD screen; by sending electric signal, it can dim an entire piece of glass. You still have a first step, between no filter and the first ND value, it’s smooth from 0.
Having a variable ND element instead of a wheel have an immediate result; you will not have a mechanical element moving so much as on the first iteration of the Sony PXW FS7. Many users reported that the ND wheels fails on them at one point. With the Vari-ND wheel; only 2 steps are necessary: with the variable ND or no filter at all. Before it was a 4 steps wheel, now it’s either clear + 2~7 stop range, in seamless transition steps up to 1/128. Previously, with the FS7 mark 1, to change value you need to get the right filter in the wheel, losing time as it’s quite a slow process. It was impossible to film during the ND filter adjustment as the filter holder where displaying a large black bar on your screen when rotating.
If your FS7 first edition suffer such, please check my post on how to repair this before it’s too late.
So clearly; less use of a mechanism is a more reliable choice. It’s important to notice also the you can still simulate each steps of the old FS7 version and even choose how to assign each steps if that makes you comfortable working the old way. There is a preset position available. In the Sony FS7 mark 2 menu system; you choose how to assign the 3 possible position and the ND filter will adjust to these without turning the wheel.
In the downside; the wheel to adjust the ND value is the same than the one that control the lens iris. So if you have a simple photo lens without iris ring, you will spend a lot of time switching back and forth between ND and aperture.
The Vari ND wheel can bet set to auto for a nice follow of light transition between indoor and outdoor with no steps. Or Even more crazy creative effect with a Auto performance where you ramp the aperture but still get the same amount of light coming to your sensor.
Of course, the main use is to get all shooting others parameters, iris, ISO and shutter speed, as desired and still get the perfect exposure. Even with an old FS7m1, the 3 steps where more a giant gap between each ND position and adding a matte box, stacking the exact ND filter value was the only way out. I have no need here to explain how you can save time and money by having such nice feature.
Lens lock mechanism upgrade: E-mount (lever lock type)
This one is not so much on top of my preferences. The Sony FS 7 mark 1 was very simple to use as a one man band videographer. You could take the lens between your fingers, pushing the lens’s released button and easily get the lens out with a simple twist.
But, on the FS7 mark 2; it’s quite a new and complicated way to do so. You first need to lift a locker, before being ale to unlock the lens. It’s also a not so easy to put it back as it could happen that the lens turn with the locking mechanism, the safety lock need to be armed again. This actually the same way you put a lens on the Sony Venice camera.
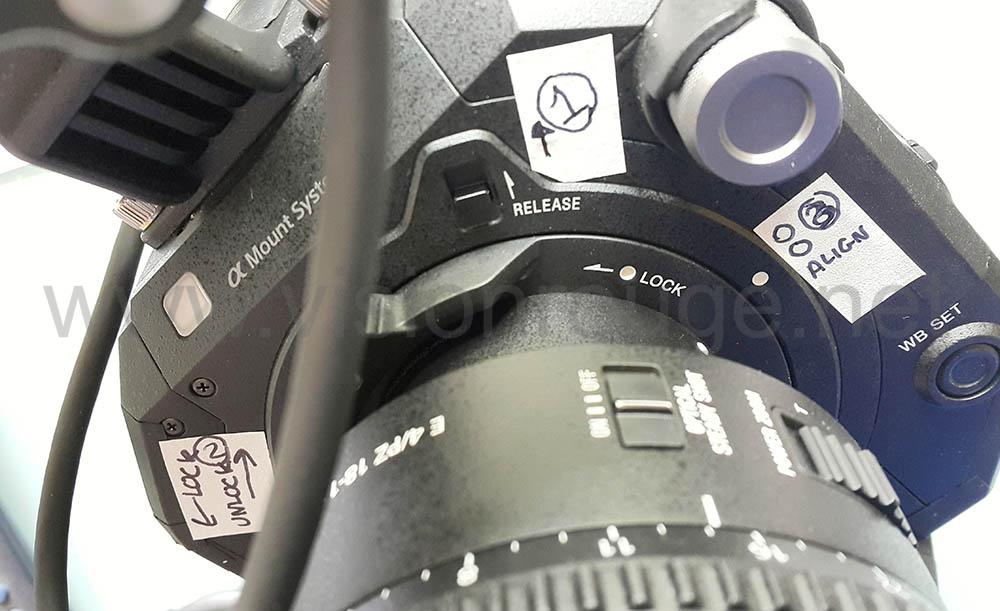
Need some training before getting it right!
There are 2 reasons why Sony upgrade their mark 2 to such system. The first one is a much reliable link between the camera body and the lens. There is no possible flimsy link as it was with the FS7M1, so you can now put heavier lens directly to the body without too much worries.
The second reason is also that the lens do not need to twist when you lock or unlock it. This avoid a potential damage to the electric contacts. Now, the lens, just get push once and locked down instead of rotating as on a DSLR; unlock, twist remove.
There are plenty of FS7 first generation camera user’s reporting that they bend the contact lenses when changing it. This new system is for sure answering this issue, but bring complication on the swapping process. It’s another reason to get the great Kit Lens (18-110 EZ) when buying your FS7 mk2.

Lot of constraint on this classic setup with the FS7M1; but get way better with the mark 2.
Again, as a freelance cameraman alone on the field. It take me a bit more time to change lens than before. That says, if you are a Canon lens user, you may want your cine Metabones firmly locked to your Sony FS7 camera body and simply switch from the Metabones for your EF lens. This is actually the best way to use your camera on the budget lens kit.
If you are planning on getting a cage for your Sony PXW FS7, please make sure the front cover is large enough to accommodate the new locking mechanism rotation. This is the only physical difference between both models.
With this new locking design, you are now able to put heavier lenses, particularly Cine PL lens with the help of an adapter.
Sony also claim they have largely improve the body structure to accept the extra weight from these lenses. I have opened mine to change the XLR module and can confirm that the front part have thicker metal design.
So If you are planning on a lot of use with heavy lenses, only the FS7 mark 2 allows you to do that in a safe way.
In my case, I’m using the lens kit provided with the new FS7 Mark 2 as it cover a S35 sensor and a very nice and versatile range. I only need to get a cheap and not so solid super wide angle as the Sony 10-18 F4 lens.
With such kit, I have these two F4 stabilized lenses in my bag and very little need for switching between both. The 10-18 super wide look tiny on the camera and you will need to reset the microphone and handle to make sure they are not in your shot!
This is a great tiny lens for the narrow streets of Hong Kong.
Microphone holder upgrade for FS7M2.
I have already covered the possible trouble with the microphone holder on the Sony FS7 Mark 1. My previous post also show what kind of upgrade you can do at home to avoid this and Sony seems to have implemented it the perfect way with the vFS7M2. The microphone holder is now a separate piece that can be drop in the bag and not on top of your camera all the time, getting the first thing damage if the camera was a bit push away against something.

Here is a picture with my modified version on the Sony FS7 Mk1.
I have rented many FS7 mark 1 before buying one myself and all of them got some trouble with the microphone holder. This is the way it’s look like on the FS7 mark 2.

EVF support with a square rod and Locker
Another nice change is the way the EVF is now in perfect alignment with the camera body. On the FSM1, the rod holding it was a unique locker for tilt and roll. So it was hard to lock it down at each adjustment. Also, most of the time, you will not lock it too firmly to make adjustments during your video shooing. So the EVF could slightly rotate and you will be losing the horizontal position on your screen. This was very annoying. They also put in place a square rode instead of a rounded with very tiny useless dents to avoid rotating.

Swapping both EVF from the Sony FSM1 to the FSM2 is electronically possible, but the screen locking device to this new rod is a bit different. So you need to take the EVF screen + the first bar all together if you want to move from each FS7 iteration.

Here is a way to upgrade the FS7 mark 1 EVF rod to easy switch between the 2 version. I’m using carbon fiber rods to safe some weight.
Extra customizable buttons.
The side of the camera has been redesigned to get a total of 10 customizable buttons instead of 6 previously. I own both camera and this redesign is a bit weird in the way that most of the push button change location. I need 5 extra seconds each time to find the “display” one. It’s just annoying for me cause I’m using both these cameras all the time; but as soon as you are confident with yours, you will not feel this disorientation.

My wish would have been to get the headphone volume able to be directed on one of these new buttons. As a camera operator shooting alone, I do not have all the time an audio mixer with a easy way to adjust my headphone level and Sony still put this level control deep inside the menu system. If you move from a Canon C300, this is quite a surprise. Both FS7 have the same missing level adjustment.
The headphone I love to use is the Audio Technica ATX-M50 as it have a way to disconnect the cable from the headphone. It’s easier to put in a bag. I also have the cheaper version (The ATH-MX20) but the cable is shorter. I have noticed that my 20 version have some connection losses on the mini-jack connector that is not on the 50; so I guess the price difference is not just a cable.
BT.2020 recording image profile added.
Well, on my line of work on assignment as cameraman for corporate shooting; I never been asked once to use this profile. The classic Rec 709 being the most requested shooting profile for commercial video. It’s may be nice to get it, but not essential for sure.
Extra LED when power on.
As stupid as it sounds; the Sony FS7 mark one did not have any power led indication. So it was easy to forget to turn it off before putting it in your camera bag. Also, as the camera takes some time to start, you could be confuse if nothing was happening depending on the position of the switch. Is it a battery problem? a camera problem?
Without the EVF attached and no power indicator as you usually do at the end of a shooting to dismantle, the On-OFF little switch was quite hard to read.
Now, with a clear green indication along the power switch, there is no error possible.
New grip locking system.
I now have stopped using the original Sony and bought a Shape one for my FS7m1 and a Zacuto for the FS7m2. The FS7 mark1 grip adjustment need to be done with a screwdriver. Now, you can use the locker on the side with your hand. I found that I was not able to lock it completely depending on the weight of my rig. I have move to the Zacuto system which allows also to twist the full grip position.

Please read here for the list of possible upgrade for your Sony FS7 (mark one and mark 2 are almost 100% identical external shape)

And here with the shape quick re-positioning system.
And more changes between FS7 mk1 and mk2.
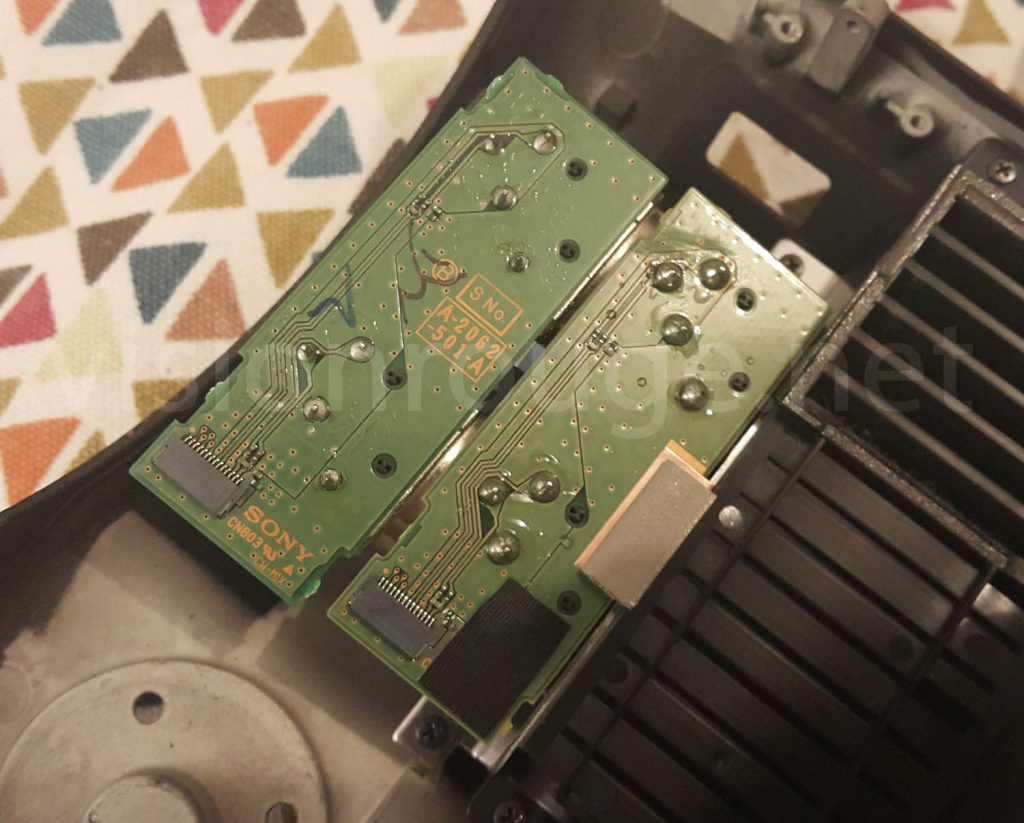
Even if the listed differences between the FS7 mark 1 and the FS7 mark 2 can be found everywhere; but there are more subtle details. For example, looking at the way the XLR board (AXM 54 in the FS7m1 and AXM-1001 in the FS7M2); you can see an obvious upgrade. The Sony FS7 mark 2 have a way better shield to protect from interference as you can see in this picture. The board also have more symmetric design for the audio signal and larger soldering point. The external shape is 100% identical. All this little improvements that will make a lot of differences over the time. A flimsy XLR plug is not something you would like to get.
Many user have some trouble when the wireless receiver are close to the camera XLR board, so I guess Sony also fix this by adding extra shield on the updated board.
Which one for you? Sony PXW FS7 Mark 1 VS mark 2
If you already have a Sony FS7 mark 2, you may consider getting the version one only as B-cam. In a similar way, if you already have a FS7 mark 1; get the upgraded mark 2, both are very complementary. I never run a situation where I was in need for electronic variable ND on both cameras.
If you have none; the version 2 is the one to go for first and start making dome damage. Even if the mark 2 is more expensive, the different in price may still be there too when you will re-sell it.

It’s also interesting to consider that the mark 2 was released with a new lens too which gives an amazing kit to start with.
I will recommend 2 x 128 GB card and 3 x Large 98W battery and you are good for almost any shooting day situation.
And you can have a look here to see how the market changed in early 2020 with the new Sony FX9 in the game.