(DIY) Solar panels to power a long duration time lapse photo project
Solar panels to power long duration DIY time lapse photo project.
In this article, I will try to help you choose the right solar panels for your long duration photography time lapse system. As you may imagine, as soon as we are talking weeks duration for a time lapse project; batteries only is not an option anymore.
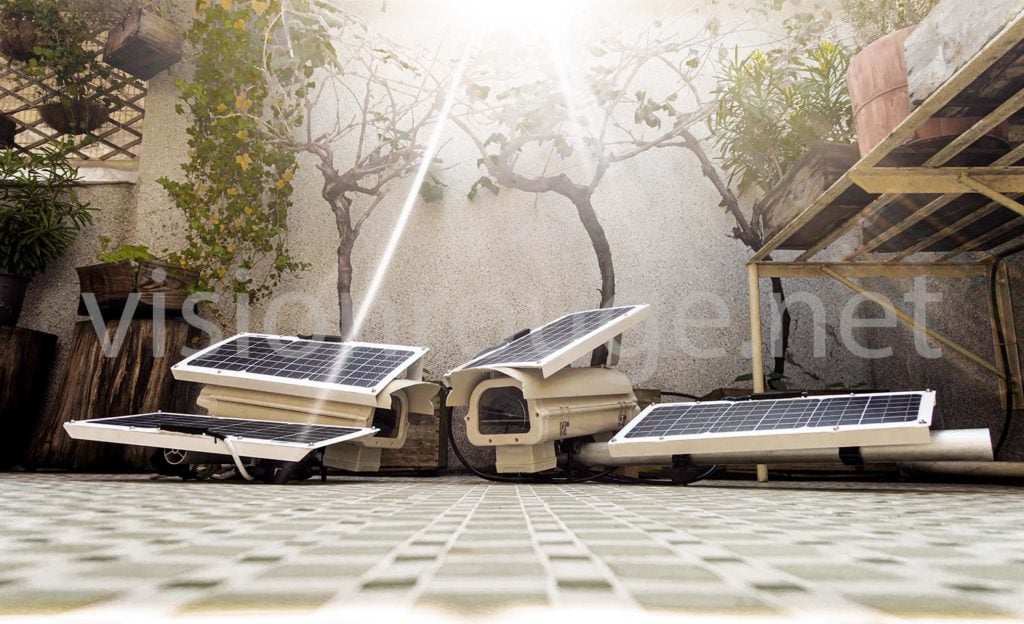
Here is part of my small army of construction time lapse enclosures under testing.
If you like to build your DIY time lapse product; you can also have a look to this page about choosing a controller for your time lapse. In the coming month, I will update with more details on batteries and enclosure choices. Of course, you can also check our ready to ship enclosure on our time lapse service page.
I have assumed you have a basic safety knowledge on connecting electric component together.
Why using Solar energy?
A long running time lapse camera need electric power. The best option being to plug it to the grid with a backup battery. But if there is no grid available as it’s usually the case around a building construction site; using the sun is the only possible alternative. Solar energy is cheap and easy to transform in something usable for a camera to run.
There will be a need battery to smooth the day and night as well as rainy days, but few hours of sun are enough to charge a battery capable of powering a photography camera and controller for weeks.
In this previous project, another light fixture receiving power 27/7, so there was no need to use power from the sun. Also, you should always let some room for the birds and not your panels.

What kind of solar panels?
There are 2 kind of solar panels you may want to consider: The Flexible one’s or the one under a glass.
Both have their cons and pro. Price is now almost similar as well as the overall ratio between size and power.
I prefer for the flexible’s one as I can drill into it for mounting them anywhere. I have to reinforce the flexible solar panels with aluminium frames on the side to be able to fix it to something.

The conventional glass model already come with a very solid frame, but on the outside only. if you panel is large, you need extra support system.
The second reason I use the flexible one is the overall weight on the structure and during transportation to the client site. They can fit any luggage and are way less sensitive to bend and twisting. Glass is glass and should be carefully manipulated. Obviously you will also have the panels shipped to you; so a flexible one’s may be cheaper too there.
On my construction time lapse enclosure, I have double tapped the border to the aluminium frame and secure with screw on the corner and center.

The downside is the external coating that can easily get dirty as it’s not so flat. I have tried to put some water repellent to avoid such with not so much success.
This coating act as mini lenses to drive the sun if you are not perfectly in front of the sun. To my understanding, they are less subject to perfect positioning.
There are also flexible solar panels without this array of lenses, but untested for now.
I will not recommend large flexible solar panels without solid frame as they may bend under strong winds. You can easily drill them using the white part on the border, but not too much in the center. It makes sens to get 2 small one more than a large one in order to build a frame.

A panel will have its maximum output when facing exactly the sun; if it bends at one point, the available power will be reduced. Flexible solar panels should be secure in a steady frame for the best results. Here is a solar farm I filmed in Hefei few months back. In this project, the frame around the glass panels is very light as it will be floating on a lake.

Solar Panels orientation.
Obviously, they need to face the sun which means South for people living in the North hemisphere. Also, they will need an inclinations that will maximize the illumination. There are plenty of online calculator depending on your geographic position. I let you check Google for more.
Be aware that depending on the time of the year you will need your time lapse camera to run, this inclinations will vary as the sun will get lower in the sky during winter time. As days are also getting shorter, I will suggest to choose the worst day of the year as reference and choose a position that fits it. Even if panels are not perfectly in line with the sun during a bright day in summer, your solar system will still have more to work with that a winter polluted day. So, you should plan your orientation for the winter dimmed day more than the sunny summer one’s.
Again, don’t be over optimistic if your client ask you for a 6 months project duration during summer time. Construction projects are often longer than expected and you want to be prepare for the extra months.

If you have multiple panels setup, they will need to have the same orientation to work. For example, if you need 15W to get the system charging but one 10W is facing the sun in the morning and the other 10W, on the afternoon; they may never get both the maximum power simultaneously.
You can still have two 10W panels facing east and two 10W facing west, so you will maximize the time your charger will receive electricity to charge your battery. The overall power is still 20W as they will never be active at the same time.
What is the power drained by a time lapse controller as Digisnap Pro?
This is a hard to answer question. It will depend on the picture camera model you will be using and the accessories you will connect to your enclosure as well. Each DIY time lapse is different and plenty of testing are in order prior to install it in a remote location.
As example; taking one picture every 30mn, 15 hours a day and using data modem to send the full JPG only every 5 pictures; a 20W solar panel is enough just to make it work.
On my system, as I have added a fan that cool down the enclosure and use about 5W of power prior to the charging part, I found that a second 20W panel was clearly safer. So between 30W and 40W should be sufficient for such frequency.

The network card is the part of your Digisnap pro that drain most of the power. If, for some reason, connection is super slow and the system struggle to send the pictures; it may get dramatic consequences on the overall stability. There is a smart move from the designer that turn of the network capability when the power is getting low. Again a larger battery and solar panels should be considered for a remote location with limited connectivity.
If there is no need for connectivity by Wi-Fi or data, a 5W should be sufficient as Digisnap Pro is claiming 5W in stand alone mode, with no network capabilities. This is according to the Harbortronics.
They also claim that they are limiting the maximum power drain from charging port to 32 W. So in nominal condition, there is no need for way larger than this. But a larger 60W panels can provide 30W amount of power even when the sun isn’t at the peak position in the sky. Larger is better.
On my system, I’m using 40W to fit the specificity of Shanghai pollution and construction site dust. I have run a successful one in Hong Kong with 20W only. I’m also directing part of the power prior to charging to a stand alone cooling system by fan. A bit more power can always be useful!

To connect a fan to a solar panel in direct, I’m using a simple 12V regulator and a temperature sensor. It’s as simple as this. The fan is not working by night time, obviously, also during cold weather. The left over electricity goes to charge the controller. You need to make sure you pick up a very low power fan to just refresh the enclosure.
In this following graph from Digisnap pro, you can see the battery charging every day except when the rain came. It was a very power hungry setup and you can imagine that three dimmed days will actually be enough to shut down such system. It also put a lot of pressure on the batteries if you do a discharge cycle every day! This is with a picture every 30 mn and sending the RAW file by Wi-Fi.

How many solar panels?
All depend on the overall power consumption and the battery size. I will not suggest to make a system running on solar only, of course. The solar panels are there to charge some batteries and your system is connected to the batteries; Not directly to the solar panels.
The first factor you should put into account is the very optimistic characteristics of some sellers particularly the one based in China. The same solar panel can be seen as a 50W on some shops when others may be more conservative with a 20W rating. Don’t be to excited, with high numbers. If a solar panel is the same size than all others 20W solar panels, it may juts be a 20W one. I have understand that there are difference in technology and the exact output may be subject to some kind of quality in production; but still.
This is a wild world in this market and high price is not also a quality proof. There are also plenty of fake or re-branded one’s all over Ebay and amazon. Going for a trusted source will be my advice there. Here, the rand name is under the coating making it hard to re-brand.

Adding solar panels is quite straight forward if they have the same voltage range. You can connect them in parallel to get extra power. Two solar panels of 10 Watts will gives you 20 Watts, it’s that simple.
On this setup, I have put the panels directly to the enclosure for 2 reasons.
-> It adds extra shadows to my enclosure during hot summer time.
-> It reduces the overall size of the system.

The downside is the fact that under strong winds, the entire time lapse enclosure may be more subject to shaking and blurry pictures may occur at this time. This is something you should weight depending on local weather. I would not use such solar panels in an video time lapse system in Hong Kong as typhoons are frequent during summer.

On each of my time lapse enclosure powered by solar; I have a second panel to boost/backup charging time.
What can go wrong during a long duration video project?
The total power (or size) of your panels is very important. If your panels do not deliver enough, the system will simply not charge and your panels are useless. It is like trying to charge a 10 V battery with a 5V charger. Nothing will happens. Despite the calculation on power you may do, the extra “Natural cause” parameters should be added.
For example, it’s quite unlikely that your solar panels will stay clean and neat, especially in a construction area.
And as birds like vantage point; your solar panels may get some specific coating leaving only few cells working.

I did many video time lapse in China and Hong Kong and, clearly, the pollution is something you should take into account. You may have 10 consecutive days of very dimmed sky in Shanghai or Beijing. You solar panels may not reach the minimum charging level for a long period of time. Adding extra panels may help in this situation and get the full charge faster too. The same calculation goes on the amount of batteries.
Which battery voltage to choose from when using solar panels ?
The voltage out of solar panels is about 16V, so it makes sens to use a battery with a 12 V nominal voltage more than 14V if you have little energy available per day.
12V batteries are also called 3S and easy to find in any electronic store. The 14.4V are called 4S and even easier to get as a lot of camera are using such.
Don’t be confused with 3S, 2S or 4S that are used in RC models. These are not a good choice for time lapse powering as they are very sensitive to heat when it come to be charged.
Of course; batteries can’t be connected directly to the solar panels. They need some kind of electronic regulator to make this work. The latest technology is called MPPT. On this DIY time lapse enclosure, I have been using Digisnap Pro module that have internal regulation and offer the monitoring and charging for 2 battery pack and one Solar/charging input.
If you are going for a DIY on you own, without this particular module, be aware that the charging module may request other kind of battery model as well.
Batteries can get warm and produce inflammable gas when charging, make sure your enclosure have enough ventilation.

I will publish soon a full article on the different batteries option you can find for a time lapse project.
Let us help you create your photography time lapse project?
Of course, we will be happy to help you set up your long duration photography camera system. We did many of these in many location and will be the best partner in Asia to deliver great video of your construction project. You can connect directly within this website to describe your needs,

This is the last picture of few time lapse enclosures before installing them on my client’s construction site!
Remark/disclaimer:
I did not receive any discount or specific offer from any of the product I refer to in this article.
This is my personal findings living in South Asia, so it may be tweaked to your specific region.
Harbotronics team send me their power consumption and I have updated my post accordingly.